A little while ago I was asked whether it would be possible to control hardware from a phone with the IOIO board from code written in Processing’s Android mode. Turns out you can – making it quite easy to develop Android apps that can control hardware in the real world – which is awesome. I didn’t find documentation on how to do this elsewhere online, so I thought I should post the gist of it here for posterity.
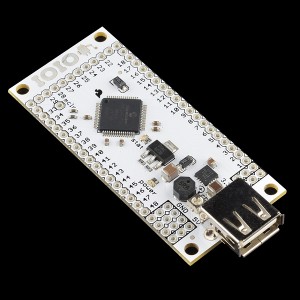
This is the IOIO board:
1. Download and install the Android SDK. This link will send you to the download page, which also has a guide worth reading.
2. Download and install Processing 2.0a4 or later (or the latest version – alpha releases are coming pretty frequently) – support for Android in Processing 1.5.1 no longer works.
2.5. Before trying anything with the IOIO board, you may want to make sure that Processing in Android mode works – plenty can go wrong just getting this set up. I highly recommend reading the Processing in Android wiki page (if you haven’t already) before going too far.
3. Download this version (ioio.zip) of Ytai’s IOIO library (equivalent to 3.11), exported in .jar format for use in Processing.
4. Unzip ioio.zip and install it as you would a Processing library (inside a folder called ‘libraries’ in your Processing sketch folder).
5. Open processing – You should see ‘ioio’ as an option under the ‘sketch’ -> ‘import library’ option
6. The import statements should like this:
import ioio.lib.util.*;
import ioio.lib.impl.*;
import ioio.lib.api.*;
import ioio.lib.api.exception.*;
7. Go here: http://code.google.com/p/apwidgets/downloads/list and download the latest (and awesome!) APWidgets library, and put it in the same libraries folder that you put the ioio library. (this is optional, but if you want any GUI elements like the buttons or checkboxes used in the examples below, you’ll want it).
8. There are a few basic things to remember when doing Android development in Processing for the IOIO board.
- EVERY sketch you write for the IOIO board needs to have ‘internet’ permissions. To enable this, go to the ‘Android’ menu in Processing, select ‘Sketch Permissions’, and scroll down until you see the ‘INTERNET’ checkbox, check it, and save.
- Theory wise, the IOIO functions need to be put in their own thread – if you’re not familiar with threads in Processing, this post from Dan Shiffman is a great place to start.
- Usage of basic functions from the IOIO library is exactly as it appears in most of Ytai’s examples, but examples (like his HelloIOIO example) that use the AbstractIOIOActivity don’t work. That’s because we can’t make or use a separate Android activity straight from Processing.
/* IOIO Test 2 -
 * Toggling the onboard LED on the IOIO board and changing rectangle size through Processing in Android mode
 * by Ben Leduc-Mills
 * This code is Beerware - feel free to reuse and credit me, and if it helped you out and we meet someday, buy me a beer.
 */

//import apwdidgets
import apwidgets.*;

//import ioio
import ioio.lib.util.*;
import ioio.lib.impl.*;
import ioio.lib.api.*;
import ioio.lib.api.exception.*;

//make a widget container and a button
APWidgetContainer widgetContainer;
APButton button1;

//our rectangle size
int rectSize = 100;

//boolean to turn the light on or off
boolean lightOn = false;

//create a IOIO instance
IOIO ioio = IOIOFactory.create();

//create a thread for our IOIO code
myIOIOThread thread1;

void setup() {

  //instantiate our thread
  thread1 = new myIOIOThread("thread1", 100);
  //start our thread
  thread1.start();

  size(480, 800);
  smooth();
  noStroke();
  fill(255);
  rectMode(CENTER);     //This sets all rectangles to draw from the center point

  //create new container for widgets
  widgetContainer = new APWidgetContainer(this);

  //create new button from x- and y-pos. and label. size determined by text content
  button1 = new APButton(10, 10, "Toggle LED");

  //place button in container
  widgetContainer.addWidget(button1);
}

void draw() {
  background(#FF9900);
  rect(width/2, height/2, rectSize, rectSize);
}

//onClickWidget is called when a widget is clicked/touched
void onClickWidget(APWidget widget) {

  if (widget == button1) { //if it was button1 that was clicked
    //rectSize = 100; //set the smaller size

    if (lightOn == true) {
      lightOn = false;
      rectSize = 50;
    }
    else if (lightOn == false) {
      lightOn = true;
      rectSize = 100;
    }
  }
}/* This is our thread class, it's a subclass of the standard thread class that comes with Processing
* we're not really doing anything dramatic, just using the start and run methods to control our interactions with the IOIO board
*/
class myIOIOThread extends Thread {
boolean running; //is our thread running?
String id; //in case we want to name our thread
int wait; //how often our thread should run
DigitalOutput led; //DigitalOutput type for the onboard led
int count; //if we wanted our thread to timeout, we could put a counter on it, I don't use it in this sketch
//our constructor
myIOIOThread(String s, int w) {
id = s;
wait = w;
running = false;
count = 0;
}
//override the start method
void start() {
running = true;
//try connecting to the IOIO board, handle the case where we cannot or the connection is lost
try {
IOIOConnect(); //this function is down below and not part of the IOIO library
}
catch (ConnectionLostException e) {
}
//try setting our led pin to the onboard led, which has a constant 'LED_PIN' associated with it
try {
led = ioio.openDigitalOutput(IOIO.LED_PIN);
}
catch (ConnectionLostException e) {
}
//don't forget this
super.start();
}
//start automatically calls run for you
void run() {
//while our sketch is running, keep track of the lightOn boolean, and turn on or off the led accordingly
while (running) {
//count++;
//again, we have to catch a bad connection exception
try {
led.write(lightOn);
}
catch (ConnectionLostException e) {
}
try {
sleep((long)(wait));
}
catch (Exception e) {
}
}
}
//often we may want to quit or stop or thread, so I include this here but I'm not using it in this sketch
void quit() {
running = false;
ioio.disconnect();
interrupt();
}
//a simple little method to try connecting to the IOIO board
void IOIOConnect() throws ConnectionLostException {
try {
ioio.waitForConnect();
}
catch (IncompatibilityException e) {
}
}
}10. The code should compile both with an emulator and on the phone, though obviously it won’t work through the emulator. To send to the phone, plug your phone into the computer and select ‘sketch’ -> ‘run on device’. Processing should detect, install, and launch the sketch on your device. Yay!
11. After the sketch is installed on your phone, you’ll have to unplug it from your computer, and plug it into your IOIO board. Make SURE you have USB debugging activated. Your phone should give some indication that it has a USB connection when you plug it in.
12. You should see your sketch in along with the other apps – go ahead and launch it. The button should toggle on and off the yellow LED on the IOIO board. Success! (Note: If it doesn’t work, try relaunching the app a few times – this fixed things for me a few times, though your milage may vary.)
13. Example 2: Toggling a real LED, and changing the color of a rectangle based on analog values from a potentiometer.
For this to work, you’ll need an LED properly (e.g., with a resistor of appropriate value) hooked up to pin 3 of your IOIO board, and a trim pot (or other analog sensor) hooked up to pin 37.
Main Tab:
/* IOIO Test 4 -
 * Toggling a real LED on pin 3, and reading values from a potentiometer on pin 37 through Processing in Android mode
 * by Ben Leduc-Mills
 * This code is Beerware - feel free to reuse and credit me, and if it helped you out and we meet someday, buy me a beer.
 */

import apwidgets.*;

import ioio.lib.util.*;
import ioio.lib.impl.*;
import ioio.lib.api.*;
import ioio.lib.api.exception.*;

APWidgetContainer widgetContainer;
APButton button1;
int rectSize = 100;
boolean lightOn = false;

IOIO ioio = IOIOFactory.create();
myIOIOThread thread1;

void setup() {
  thread1 = new myIOIOThread("thread1", 100);
  thread1.start();

  size(480, 800);
  smooth();
  noStroke();
  fill(255);
  rectMode(CENTER);     //This sets all rectangles to draw from the center point

  widgetContainer = new APWidgetContainer(this);
  button1 = new APButton(10, 10, "Toggle LED");
  widgetContainer.addWidget(button1); //place button in container
}

void draw() {
  background(#FF9900);
  //change the fill value based on the analog read of our potentiometer
  fill(thread1.value * 100); //it's * 100 because we only get values from 0-1, so really this should be * 255, or use the map function
  rect(width/2, height/2, rectSize, rectSize);
}

//onClickWidget is called when a widget is clicked/touched
void onClickWidget(APWidget widget) {

  if (widget == button1) { //if it was button1 that was clicked

    if (lightOn == true) {
      lightOn = false;
      rectSize = 50;
    }
    else if (lightOn == false) {
      lightOn = true;
      rectSize = 100;
    }
  }
}
And our IOIO thread, with some slight changes:
class myIOIOThread extends Thread {

  boolean running;
  String id;
  int wait;
  DigitalOutput led;
  AnalogInput in;
  int count;
  int ledpin = 3; //pin for our led
  int potpin = 37; // pin for our potentiometer
  float value; //our analog values range from 0 to 1

  myIOIOThread(String s, int w) {

    id = s;
    wait = w;
    running = false;
    count = 0;

  }

  void start() {
    running = true;

    try {
      IOIOConnect();
    }
    catch (ConnectionLostException e) {
    }

    try {

      led = ioio.openDigitalOutput(ledpin);
      in = ioio.openAnalogInput(potpin);
    }
    catch (ConnectionLostException e) {
    }

    super.start();
  }

  void run() {

    while (running) {
      //count++;
      try {
        led.write(lightOn);
        value = in.read();
      }
      catch (ConnectionLostException e) {
      }
      catch (InterruptedException e) {
      }

      try {
        sleep((long)(wait));
      }
      catch (Exception e) {
      }
    }
  }

  void quit() {
    running = false;
    //led.close();
    ioio.disconnect();
    interrupt();
  }

  void IOIOConnect() throws ConnectionLostException {

    try {
      ioio.waitForConnect();
    }
    catch (IncompatibilityException e) {
    }
  }
}
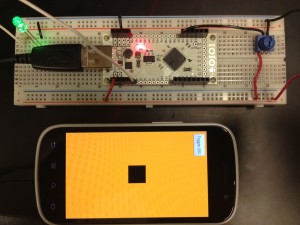
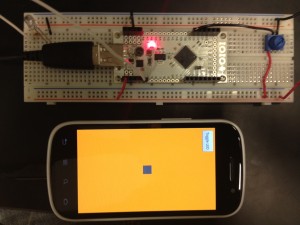
14. Upload to your phone as before, hook up your phone to the IOIO board, and launch the app. The button should turn on and off the LED, and the trim pot should change the color of the rectangle in the middle of the screen. Huzzah!
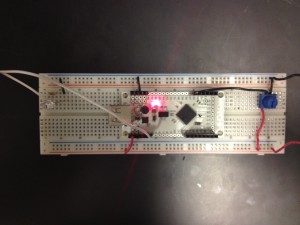
Here are some pics: for the visual learners out there:




Hey thanks for sharing, ¿ are you work with BT ?
Haven’t worked with bluetooth yet, although I don’t believe it should be that difficult. I’ll post something on it if I ever do.
how do we know the phone is connected to the Processing? when i connect my phone to computer, there is nothing happen to the Processing, either it detect my phone or not. so, how should i do?
If I’m understanding you correctly, Processing does not indicate that your Android device is connected when you connect it. You have to try running the Processing sketch on the Device (choose the ‘Run on Device’ option by pressing shift on your keyboard and then clicking the run button). If you get errors when trying to run on your device, obviously check your code, as well as your Android setup (do you have the Android SDK installed, etc.). Hope that helps!
Thanks for this! I’ve been playing with Android mode in Processing, and I can’t wait to add a IOIO into the mix.
Do you have a guide for compiling the IOIO Library into a JAR? I want to try getting the latest IOIOLib into Processing.
Spike – all I did was take all the IOIO core library files and exported them as a .JAR. After that you just have to stick the .JAR file in a folder called ‘library’ then stick THAT folder in a folder with whatever you want the library to be called (e.g. ‘IOIOLib’). Last step is to put your folder into the ‘libraries’ folder in Processing. Restart Processing and you should be good to go.
Thanks for this! I’ve used this as inspiration to create a IOIO library for Processing. I’ve even got Bluetooth working!
https://github.com/PinkHatSpike/pioio
Nice work! I’ll definitely check this out – thanks!
Hey Ben, thanks for this! I’m having some trouble getting my devices to communicate and I’m wondering if you could shed some light. I’m running a nexus 7 on 4.2.2 and I have the new ioio mint from adafruit which seems like it should be the same. Whenever I try to launch this sketch that you’ve created I get an error that says something like “im sorry this has stopped”.
When my device is plugged in to the computer I get an error that looks like this “FATAL EXCEPTION: Thread-265
java.lang.NullPointerException
at processing.test.ioiotest3.ioiotest3$myIOIOThread.run(ioiotest3.java:151)”
Any thoughts?
Thanks
Jay
Hi Jay,
It’s hard to debug from here.
A few things you might try:
Remake your own IOIO library from the instructions below (or try PinkHatSpike’s library)
Did you have ‘INTERNET’ permissions on your sketch?
Are you using the latest version of Processing 2?
If that doesn’t work, sit tight. I’m working on something that should help out tremendously. Should be out in a month or two.
Your IOIO Test 2 is not working for me. I just get a black screen. When I try with all the IOIO parts commented out, the apwidgets draws the button fine, but with IOIO parts in there it isn’t working. No errors returned, just a black screen with no response.
I’m running:
Android 4.22 on a Galaxy Nexus
a MINT0010 ioio
with 0304 Bootloader and
0324 Firmware
and Processing 2.0b8
Any ideas?
Thanks.
Hmm. Hard to tell from here. Do you have INTERNET checked in your sketch permissions?
Like I suggested above, you may also want to roll your own version of the IOIO library or try using PinkHatSpike’s.
If that doesn’t work, I’ll be releasing something in the next few months that should fix everything.
Hi Ben,
thanks for getting back to me! Sorry to invade you with questions on this but you seem to be one of the few people on the internet doing this and I’m pretty sure the only IOIO library for processing, although I just noticed that other one above my comment.
i do have the most up to date processing and have all my permissions checked properly. When debugging, it seems that my issue happens in the thread1.run() function. if I take out the “try” section and replace it just simply by println(lightOn); the button changes the boolean and it’s passed on to the function properly. if i add that led.write part in it doesn’t seem to run over USB or bluetooth. Sometimes processing throws a null pointer and points to thread1.run() as the place where it’s happening.
thanks for your help!
Jay
error package apwidgets does not exist ? ?? help !
Sounds like you didn’t install the APWidgets library properly — the directions are there somewhere in the post. Good luck!
downloads but does not run on android 5.0 (nexus 4) ?
Ephraim — check the documentation and github for the SIKIO kit from SparkFun -https://github.com/sparkfun/SIKIO/wiki – there’s a detailed software installation guide that will get you as far as I can.